
nodejs-electron零碎
electron中, 子进程的加载全解
将 stdio 选项设置为 inherit 或 pipe 主要影响的是子进程的输入和输出行为:
inherit: 子进程将继承父进程的标准输入、输出和错误流。这意味着子进程的输出会直接显示在父进程的终端中。这种方式不会对子进程的执行产生其他影响,只是改变了输出的显示方式。pipe: 子进程的标准输入、输出和错误流会被重定向到父进程中。你可以通过监听这些流来捕获子进程的输出。这种方式也不会对子进程的执行产生其他影响,但需要你在父进程中处理这些流。ignore: 忽略子进程的标准输入。
总结来说,这些设置主要影响的是子进程的输出行为,不会对子进程的执行逻辑产生其他影响。
下面我们来重点说下pipe
通过设置 stdio 选项为 pipe,你可以与子进程进行通信。具体来说,你可以通过监听子进程的 stdout 和 stderr 事件来接收子进程的输出,并且可以通过 stdin 向子进程发送输入。
1 | const { spawn } = require('child_process'); |
设置一个数组,三个元素都是 'pipe' 是为了分别重定向子进程的标准输入(stdin)、标准输出(stdout)和标准错误(stderr)流。具体来说:
- 第一个
'pipe':重定向子进程的标准输入(stdin),这样你可以通过父进程向子进程发送输入。 - 第二个
'pipe':重定向子进程的标准输出(stdout),这样你可以在父进程中捕获子进程的输出。 - 第三个
'pipe':重定向子进程的标准错误(stderr),这样你可以在父进程中捕获子进程的错误信息。
这样,你就可以在父进程中与子进程进行通信,并捕获子进程的输出和错误信息。
使用pipe代替inherit
使用 inherit 方式时,子进程的输出会直接显示在 Electron 主进程的终端中,这样确实会混合在一起,难以区分。
如果你需要区分子进程和主进程的输出,可以考虑以下几种方法:
添加前缀:在子进程的输出前添加一个前缀,以便区分。例如,可以在子进程的输出中添加
[Child Process]前缀。(但这样需要改动子进程自身的日志格式, 如果调用的是第三方的子进程模块, 或是子进程项目是可以单独运行等情况下, 这种方式难免有些南辕北辙了, 而且工作量太大, 因此不建议。)使用
pipe并手动处理输出:将stdio设置为pipe,然后在主进程中手动处理子进程的输出,并添加前缀或其他标识。
以下是使用 pipe 并手动处理输出的示例:
1 | const { spawn } = require('child_process'); |
通过这种方式,你可以在主进程中捕获子进程的输出,并添加前缀以便区分。
electron中, 如何调试主进程
由于electron的主进程实际上是一个nodejs程序, 因此我们可以借助浏览器的开发者工具或是vscode的运行和调试模块来调试electron的主进程。
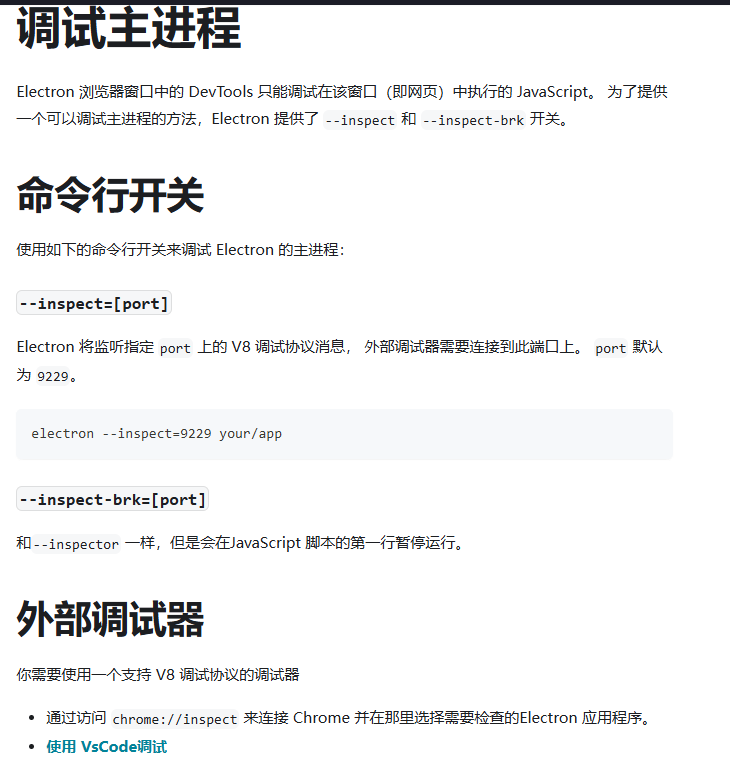
如何通过 浏览器的开发者工具 调试electron主进程
这里是electron官网关于此部分的描述, 调试主进程
但是, 如果在quasar中, 是无法使用此参数的, quasar中关于此调试的配置, 被集成在了quasar.config.js这个配置文件中。
1 | // quasar.config.js |
然后, 就和electron文档中的一样, 安装原有的后续步骤进行即可。以下是后续步骤:
确保调试端口配置正确:
在 Chrome 的 chrome://inspect 页面:
- 点击 “Configure…”
- 添加以下地址:
- localhost:5858
- 127.0.0.1:5858
- 在 “Remote Target” 下可以看到你的 Electron 主进程
- 点击 “inspect” 打开调试工具(此步骤需要在更改并保存代码后, 关闭旧调试工具窗口并重新执行)
关于主进程调试过程中如何热重载的问题
目前, 基于vite-electron部分似乎已经默认的启动了热重载, 参考
但在对主进程调试用的 浏览器的开发者工具 中却无法热重载, 每次都需要重新的点击在 “Remote Target” 下的 Electron 主进程的 “inspect” 来打开调试工具, 以手动更新。(目前仍未找到如何实现此部分的热重载的方案)
使用 Chrome 的 chrome://inspect 调试 Electron 主进程时,每次代码更改后都需要重新点击 “inspect” 是一个常见的限制。
这是因为:
- 当主进程重启时,调试连接会断开
- Chrome DevTools Protocol 没有提供自动重连的机制
- electron-reloader 只负责重启主进程,不会处理调试连接
目前没有完美的解决方案来实现 Chrome DevTools 的自动重连。这也是为什么大多数开发者推荐使用 VS Code 进行主进程调试的原因,因为 VS Code 能够自动处理重连。
如何通过 vscode的运行调试模块 调试electron主进程
未作调研, 可以参考前面部分中提到的electron官网的调试主进程的部分做了解, 或是通过ai工具来帮忙适配。
electron中, 如何在主进程中, 调用渲染进程中的方法
可以通过以下几种方式在主进程中调用渲染进程的函数:
使用
webContents.executeJavaScript()- 最直接的方式(不推荐):1
2
3
4
5
6
7
8
9
10
11// typescript:frontend/src-electron/electron-main.ts
// ... existing code ...
// 在主进程中执行渲染进程的函数
mainWindow?.webContents.executeJavaScript(`
window.yourFunctionName('参数1', '参数2')
`).then((result) => {
console.log('函数执行结果:', result);
}).catch((err) => {
console.error('执行失败:', err);
});使用 IPC 通信 - 更规范的方式(目前出于安全限制, 在electron的渲染进程中, ipcRenderer已被禁止使用了):
1
2
3
4
5
6
7
8
9
10
11
12
13
14
15
16// typescript:frontend/src-electron/electron-main.ts
// 主进程中发送事件
mainWindow?.webContents.send('execute-renderer-function', arg1, arg2);
// 如果需要获取返回值,可以使用 invoke
ipcMain.handle('get-renderer-result', async (event, ...args) => {
// 发送请求到渲染进程
mainWindow?.webContents.send('execute-renderer-function', ...args);
// 等待渲染进程的响应
return new Promise((resolve) => {
ipcMain.once('renderer-result', (event, result) => {
resolve(result);
});
});
});1
2
3
4
5
6
7
8
9
10
11// typescript:frontend/src/your-component.ts
// 渲染进程中监听事件
import { ipcRenderer } from 'electron';
ipcRenderer.on('execute-renderer-function', (event, ...args) => {
// 执行你的函数
const result = yourFunction(...args);
// 如果需要返回结果
ipcRenderer.send('renderer-result', result);
});使用预加载脚本作为桥接 - 最推荐的方式(也是目前最可靠和唯一的方式):
以下是一个完整的示例,展示如何在主进程中触发渲染进程的状态更新:
首先在预加载脚本中设置通信桥接:
1
2
3
4
5
6
7
8
9
10
11
12
13
14
15
16// typescript:frontend/src-electron/preload.ts
import { contextBridge, ipcRenderer } from 'electron';
contextBridge.exposeInMainWorld('electronAPI', {
// 监听主进程的更新请求
onUpdateState: (callback: (data: any) => void) => {
const listener = (_event: any, data: any) => callback(data);
ipcRenderer.on('update-state', listener);
return () => ipcRenderer.removeListener('update-state', listener);
},
// 向主进程发送更新结果
sendUpdateResult: (result: any) => {
ipcRenderer.send('update-result', result);
}
});在渲染进程(Vue组件)中处理更新:
1
2
3
4
5
6
7
8
9
10
11
12
13
14
15
16
17
18
19
20
21
22
23
24
25
26
27
28
29
30
31
32
33
34
35
36
37
38
39
40
41
42
43
44
45
46// typescript:frontend/src/components/YourComponent.vue
<template>
<div>
<p>状态: {{ state.status }}</p>
<p>端口: {{ state.port }}</p>
<p>消息: {{ state.message }}</p>
</div>
</template>
<script setup lang="ts">
import { reactive, onMounted, onUnmounted } from 'vue';
// 定义响应式状态
const state = reactive({
status: '',
port: 0,
message: ''
});
// 处理来自主进程的更新
function handleStateUpdate(data: any) {
// 更新状态
if (data.status) state.status = data.status;
if (data.port) state.port = data.port;
if (data.message) state.message = data.message;
// 通知主进程更新完成
window.electronAPI.sendUpdateResult({
success: true,
updatedFields: Object.keys(data)
});
}
// 设置监听器
let cleanup: (() => void) | null = null;
onMounted(() => {
// 监听主进程的更新请求
cleanup = window.electronAPI.onUpdateState(handleStateUpdate);
});
onUnmounted(() => {
// 清理监听器
cleanup?.();
});
</script>在主进程中触发更新:
1
2
3
4
5
6
7
8
9
10
11
12
13
14
15
16
17
18
19
20
21
22
23
24
25
26
27
28
29
30
31
32
33
34
35
36
37
38
39
40
41
42
43
44
45
46
47
48
49
50
51
52
53
54
55
56
57
58
59
60
61
62
63
64
65
66
67
68
69
70
71
72
73
74
75
76
77
78
79
80
81
82
83
84
85
86// typescript:frontend/src-electron/electron-main.ts
import { app, BrowserWindow, ipcMain } from 'electron';
// ... existing code ...
// 更新渲染进程状态的函数
function updateRendererState(data: any) {
return new Promise((resolve, reject) => {
// 发送更新请求到渲染进程
mainWindow?.webContents.send('update-state', data);
// 设置超时
const timeout = setTimeout(() => {
cleanup();
reject(new Error('更新超时'));
}, 5000);
// 等待渲染进程的响应
const cleanup = () => {
clearTimeout(timeout);
ipcMain.removeListener('update-result', handleResult);
};
const handleResult = (_event: any, result: any) => {
cleanup();
resolve(result);
};
ipcMain.once('update-result', handleResult);
});
}
// 使用示例:
// 1. 单个字段更新
async function updateStatus() {
try {
const result = await updateRendererState({
status: '正在运行'
});
console.log('状态更新成功:', result);
} catch (error) {
console.error('状态更新失败:', error);
}
}
// 2. 多个字段同时更新
async function updateMultipleFields() {
try {
const result = await updateRendererState({
port: backendPort,
message: '服务已启动',
status: 'active'
});
console.log('多字段更新成功:', result);
} catch (error) {
console.error('多字段更新失败:', error);
}
}
// 3. 定时更新示例
setInterval(async () => {
try {
await updateRendererState({
port: backendPort,
status: '运行中'
});
} catch (error) {
console.error('定时更新失败:', error);
}
}, 1000);
// 4. 条件更新示例
let lastPort = backendPort;
setInterval(async () => {
if (backendPort !== lastPort) {
try {
await updateRendererState({
port: backendPort,
message: '端口已更新'
});
lastPort = backendPort;
} catch (error) {
console.error('端口更新失败:', error);
}
}
}, 1000);添加类型定义:
1
2
3
4
5
6
7
8
9
10
11
12
13
14
15
16
17
18
19
20// typescript:frontend/src/types/electron.d.ts
interface UpdateData {
status?: string;
port?: number;
message?: string;
}
interface UpdateResult {
success: boolean;
updatedFields: string[];
}
declare global {
interface Window {
electronAPI: {
onUpdateState: (callback: (data: UpdateData) => void) => () => void;
sendUpdateResult: (result: UpdateResult) => void;
}
}
}如果使用 Pinia 状态管理:
1
2
3
4
5
6
7
8
9
10
11
12
13
14
15
16
17
18
19
20
21
22
23
24
25
26
27
28// typescript:frontend/src/stores/app.ts
import { defineStore } from 'pinia';
export const useAppStore = defineStore('app', {
state: () => ({
status: '',
port: 0,
message: ''
}),
actions: {
updateState(data: UpdateData) {
if (data.status) this.status = data.status;
if (data.port) this.port = data.port;
if (data.message) this.message = data.message;
},
setupElectronListeners() {
return window.electronAPI.onUpdateState((data) => {
this.updateState(data);
window.electronAPI.sendUpdateResult({
success: true,
updatedFields: Object.keys(data)
});
});
}
}
});
这种实现方式的优点:
- 类型安全:完整的类型定义
- 可靠性:使用 IPC 通信而不是 executeJavaScript
- 双向通信:可以确认更新是否成功
- 灵活性:可以更新单个或多个字段
- 错误处理:包含超时和错误处理机制
- 状态管理:可以与 Vue 的响应式系统或 Pinia 集成
使用这种方式,你可以从主进程安全可靠地控制渲染进程的状态更新,同时保持代码的可维护性和类型安全性。
建议:
避免直接使用
executeJavaScript,因为(极为不推荐):- 可能存在安全风险
- 代码难以维护
- 不利于类型检查
如果只是简单的数据传递,使用 IPC 通信就足够了(但目前已无法使用)。
优先使用预加载脚本的方式,因为它(推荐的方式):
- 提供了更好的类型安全
- 维护了上下文隔离
- 更容易管理和维护
- 提供了更好的安全性
记住要处理错误情况和异步操作。
确保在调用渲染进程函数时,窗口已经完全加载:
1
2
3
4// typescript:frontend/src-electron/electron-main.ts
mainWindow?.webContents.on('did-finish-load', () => {
// 这里是安全的时机调用渲染进程函数
});
注意:无论使用哪种方式,都要注意安全性,避免直接执行不可信的代码。同时,建议将这些通信逻辑封装成可复用的模块,以便更好地管理和维护。
electron中, 如果在渲染进程中, 调用主进程中的方法, 或是其它nodejs进程中的方法
在渲染进程中调用主进程或其他 Node.js 进程的函数主要有以下几种方式:
通过预加载脚本(Preload)和 IPC 通信 - 最推荐的方式:
1
2
3
4
5
6
7
8
9
10
11
12
13
14
15
16
17
18
19
20// typescript:frontend/src-electron/preload.ts
import { contextBridge, ipcRenderer } from 'electron';
// 在预加载脚本中暴露接口
contextBridge.exposeInMainWorld('electronAPI', {
// 异步函数调用
callMainFunction: async (...args) => {
return await ipcRenderer.invoke('main-function', ...args);
},
// 同步函数调用
callMainFunctionSync: (...args) => {
return ipcRenderer.sendSync('main-function-sync', ...args);
},
// 订阅主进程事件
onMainEvent: (callback) => {
ipcRenderer.on('main-event', (event, ...args) => callback(...args));
}
});1
2
3
4
5
6
7
8
9
10
11
12
13
14// typescript:frontend/src-electron/electron-main.ts
import { ipcMain } from 'electron';
// 在主进程中处理调用
ipcMain.handle('main-function', async (event, ...args) => {
// 异步函数实现
return await yourMainFunction(...args);
});
// 处理同步调用
ipcMain.on('main-function-sync', (event, ...args) => {
// 同步函数实现
event.returnValue = yourMainFunctionSync(...args);
});1
2
3
4
5
6
7
8
9
10
11
12
13
14
15
16
17
18
19
20// typescript:frontend/src/components/YourComponent.vue
// 在渲染进程中使用
async function callMainProcess() {
try {
// 异步调用
const result = await window.electronAPI.callMainFunction('arg1', 'arg2');
console.log('异步调用结果:', result);
// 同步调用
const syncResult = window.electronAPI.callMainFunctionSync('arg1', 'arg2');
console.log('同步调用结果:', syncResult);
// 监听主进程事件
window.electronAPI.onMainEvent((data) => {
console.log('收到主进程事件:', data);
});
} catch (error) {
console.error('调用失败:', error);
}
}调用其他 Node.js 进程的函数(通过主进程作为中介):
1
2
3
4
5
6// typescript:frontend/src-electron/preload.ts
contextBridge.exposeInMainWorld('nodeAPI', {
callNodeProcess: async (...args) => {
return await ipcRenderer.invoke('node-process', ...args);
}
});1
2
3
4
5
6
7
8
9
10
11
12
13
14
15
16
17
18
19
20
21
22// typescript:frontend/src-electron/electron-main.ts
import { fork } from 'child_process';
// 创建子进程
const nodeProcess = fork('path/to/your/node/script.js');
// 处理渲染进程的调用
ipcMain.handle('node-process', async (event, ...args) => {
return new Promise((resolve, reject) => {
// 向子进程发送消息
nodeProcess.send({ type: 'function-call', args });
// 接收子进程的响应
nodeProcess.once('message', (response) => {
if (response.error) {
reject(response.error);
} else {
resolve(response.result);
}
});
});
});1
2
3
4
5
6
7
8
9
10
11
12// typescript:path/to/your/node/script.js
// 子进程中的处理
process.on('message', async (message) => {
if (message.type === 'function-call') {
try {
const result = await yourNodeFunction(...message.args);
process.send({ result });
} catch (error) {
process.send({ error: error.message });
}
}
});使用
@electron/remote模块(不推荐,但在某些场景可能有用):1
2
3
4
5
6
7
8
9
10
11
12
13
14// typescript:frontend/src-electron/electron-main.ts
import { initialize } from '@electron/remote/main';
// 初始化remote模块
initialize();
// 在创建窗口时启用remote
mainWindow = new BrowserWindow({
webPreferences: {
nodeIntegration: true,
contextIsolation: false,
enableRemoteModule: true
}
});1
2
3
4
5// typescript:frontend/src/components/YourComponent.vue
import { remote } from '@electron/remote';
// 直接调用主进程模块
const result = remote.app.getPath('userData');
建议和注意事项:
优先使用预加载脚本和 IPC 通信方式,因为:
- 保持了上下文隔离
- 提供了更好的安全性
- 代码结构更清晰
- 更容易维护和调试
对于性能敏感的操作:
- 考虑使用同步 IPC 调用(但要注意可能阻塞UI)
- 可以实现批处理机制
- 考虑使用 Worker 进程处理计算密集型任务
错误处理:
1
2
3
4
5
6
7
8
9// typescript:frontend/src/components/YourComponent.vue
try {
const result = await window.electronAPI.callMainFunction();
} catch (error) {
// 处理错误
console.error('调用主进程函数失败:', error);
// 可以显示用户友好的错误提示
showErrorNotification(error);
}类型安全:
1
2
3
4
5
6
7
8
9
10// typescript:frontend/src/types/electron.d.ts
declare global {
interface Window {
electronAPI: {
callMainFunction: (arg1: string, arg2: number) => Promise<string>;
callMainFunctionSync: (arg1: string, arg2: number) => string;
onMainEvent: (callback: (data: any) => void) => void;
};
}
}性能优化:
1
2
3
4
5
6
7
8
9
10
11
12
13
14
15
16
17
18
19
20// typescript:frontend/src-electron/electron-main.ts
// 批处理示例
let batchQueue: any[] = [];
let batchTimeout: NodeJS.Timeout | null = null;
ipcMain.handle('batch-process', async (event, item) => {
batchQueue.push(item);
if (!batchTimeout) {
batchTimeout = setTimeout(async () => {
const items = [...batchQueue];
batchQueue = [];
batchTimeout = null;
// 批量处理
const results = await processBatch(items);
event.sender.send('batch-results', results);
}, 100);
}
});
这些方法可以根据你的具体需求选择使用。通常建议从最简单的 IPC 通信开始,然后根据需要逐步添加更复杂的功能。
electron中, ipcRenderer都有哪些方法
ipcRenderer 的主要方法可以分为以下几类:
发送消息的方法:
1
2
3
4
5
6
7
8
9
10
11
12
13
14
15
16
17// typescript:frontend/src-electron/preload.ts
import { ipcRenderer } from 'electron';
// 异步发送(不等待响应)
ipcRenderer.send('channel-name', ...args);
// 同步发送(会阻塞渲染进程直到收到响应)
const result = ipcRenderer.sendSync('channel-name', ...args);
// 发送消息到特定窗口
ipcRenderer.sendTo(windowId, 'channel-name', ...args);
// 发送消息给主窗口
ipcRenderer.sendToHost('channel-name', ...args);
// 调用主进程方法并等待结果(Promise方式)
const result = await ipcRenderer.invoke('channel-name', ...args);监听消息的方法:
1
2
3
4
5
6
7
8
9
10
11
12
13
14
15
16// typescript:frontend/src-electron/preload.ts
// 监听消息(可以多次触发)
ipcRenderer.on('channel-name', (event, ...args) => {
console.log('收到消息:', ...args);
});
// 监听消息(只触发一次)
ipcRenderer.once('channel-name', (event, ...args) => {
console.log('收到一次性消息:', ...args);
});
// 移除特定监听器
ipcRenderer.removeListener('channel-name', listener);
// 移除所有监听器
ipcRenderer.removeAllListeners('channel-name');实际应用示例:
1
2
3
4
5
6
7
8
9
10
11
12
13
14
15
16
17
18
19
20
21
22
23
24
25
26
27
28
29
30
31
32
33// typescript:frontend/src-electron/preload.ts
contextBridge.exposeInMainWorld('ipcAPI', {
// 基础消息发送
sendMessage: (channel: string, ...args: any[]) => {
ipcRenderer.send(channel, ...args);
},
// 同步消息
sendSyncMessage: (channel: string, ...args: any[]) => {
return ipcRenderer.sendSync(channel, ...args);
},
// 异步调用(Promise)
invokeMain: async (channel: string, ...args: any[]) => {
return await ipcRenderer.invoke(channel, ...args);
},
// 监听主进程消息
onMessage: (channel: string, callback: (...args: any[]) => void) => {
const listener = (event: any, ...args: any[]) => callback(...args);
ipcRenderer.on(channel, listener);
// 返回清理函数
return () => {
ipcRenderer.removeListener(channel, listener);
};
},
// 一次性监听
onceMessage: (channel: string, callback: (...args: any[]) => void) => {
ipcRenderer.once(channel, (event, ...args) => callback(...args));
}
});常见使用场景:
1
2
3
4
5
6
7
8
9
10
11
12
13
14
15
16
17
18
19// typescript:frontend/src/components/YourComponent.vue
// 1. 简单的消息发送
window.ipcAPI.sendMessage('update-something', { data: 'value' });
// 2. 需要等待响应的调用
const result = await window.ipcAPI.invokeMain('get-user-data');
// 3. 监听主进程事件
const cleanup = window.ipcAPI.onMessage('status-update', (status) => {
console.log('状态更新:', status);
});
// 4. 同步调用(谨慎使用,可能阻塞UI)
const immediate = window.ipcAPI.sendSyncMessage('get-config');
// 5. 一次性事件监听
window.ipcAPI.onceMessage('app-ready', () => {
console.log('应用就绪');
});错误处理:
1
2
3
4
5
6
7
8
9
10
11
12
13
14
15
16
17
18
19
20
21
22
23// typescript:frontend/src/components/YourComponent.vue
try {
const result = await window.ipcAPI.invokeMain('risky-operation');
} catch (error) {
console.error('操作失败:', error);
}
// 使用超时处理
async function invokeWithTimeout(channel: string, timeout = 5000) {
const timeoutPromise = new Promise((_, reject) => {
setTimeout(() => reject(new Error('操作超时')), timeout);
});
try {
return await Promise.race([
window.ipcAPI.invokeMain(channel),
timeoutPromise
]);
} catch (error) {
console.error('调用失败:', error);
throw error;
}
}类型定义:
1
2
3
4
5
6
7
8
9
10
11
12// typescript:frontend/src/types/electron.d.ts
declare global {
interface Window {
ipcAPI: {
sendMessage: (channel: string, ...args: any[]) => void;
sendSyncMessage: (channel: string, ...args: any[]) => any;
invokeMain: (channel: string, ...args: any[]) => Promise<any>;
onMessage: (channel: string, callback: (...args: any[]) => void) => () => void;
onceMessage: (channel: string, callback: (...args: any[]) => void) => void;
};
}
}
注意事项:
安全性:
- 始终通过
contextBridge暴露 API - 避免直接暴露
ipcRenderer对象 - 限制可用的通道名称
- 始终通过
性能:
- 避免频繁使用
sendSync - 大数据传输考虑分批处理
- 使用
invoke代替send+on的模式
- 避免频繁使用
可维护性:
- 统一管理通道名称
- 做好错误处理
- 及时清理不需要的监听器
调试:
- 可以添加日志记录
- 使用开发者工具监控 IPC 通信
electron中, ipcMain都有哪些方法
介绍了ipcRenderer后, 就不得不介绍下ipcMain了。
ipcMain 是主进程中用于处理 IPC 通信的模块,以下是其主要方法和使用方式:
当然, 从这些介绍中不难看出其使用时和ipcRenderer中某些方法的对应关系。当然, 我也会在下一小节中介绍这些对应关系。
基本监听方法:
1
2
3
4
5
6
7
8
9
10
11
12
13
14
15
16
17
18
19
20
21
22
23
24
25
26
27
28
// typescript:frontend/src-electron/electron-main.ts
import { ipcMain } from 'electron';
// 处理异步消息
ipcMain.on('channel-name', (event, ...args) => {
// 处理消息
console.log('收到消息:', ...args);
// 回复消息
event.reply('reply-channel', '处理结果');
// 或
event.sender.send('reply-channel', '处理结果');
});
// 处理同步消息
ipcMain.on('sync-channel', (event, ...args) => {
// 处理消息
console.log('收到同步消息:', ...args);
// 必须设置 returnValue 来响应同步消息
event.returnValue = '同步处理结果';
});
// 处理 invoke 调用
ipcMain.handle('invoke-channel', async (event, ...args) => {
// 可以返回 Promise
return await someAsyncOperation(...args);
});高级监听方法:
1
2
3
4
5
6
7
8
9
10
11
12
13
14
15
16
17
18// typescript:frontend/src-electron/electron-main.ts
// 一次性监听
ipcMain.once('one-time-channel', (event, ...args) => {
console.log('这个监听器只会触发一次');
});
// 移除监听器
const listener = (event, ...args) => {
console.log('处理消息');
};
ipcMain.on('channel-name', listener);
ipcMain.removeListener('channel-name', listener);
// 移除所有监听器
ipcMain.removeAllListeners('channel-name');
// 移除特定 handle
ipcMain.removeHandler('invoke-channel');实际应用示例:
1
2
3
4
5
6
7
8
9
10
11
12
13
14
15
16
17
18
19
20
21
22
23
24
25
26
27
28
29
30
31
32
33
34
35
36
37// typescript:frontend/src-electron/electron-main.ts
// 配置相关操作
ipcMain.handle('get-config', async (event, key) => {
try {
return await readConfigFile(key);
} catch (error) {
console.error('读取配置失败:', error);
throw error; // 错误会传递给渲染进程
}
});
// 文件操作
ipcMain.handle('save-file', async (event, { path, content }) => {
try {
await fs.promises.writeFile(path, content);
return { success: true };
} catch (error) {
console.error('保存文件失败:', error);
throw error;
}
});
// 窗口操作
ipcMain.on('window-control', (event, action) => {
const window = BrowserWindow.fromWebContents(event.sender);
switch (action) {
case 'minimize':
window?.minimize();
break;
case 'maximize':
window?.isMaximized() ? window.unmaximize() : window.maximize();
break;
case 'close':
window?.close();
break;
}
});处理大量数据:
1
2
3
4
5
6
7
8
9
10
11
12
13
14
15
16
17
18
19
20// typescript:frontend/src-electron/electron-main.ts
// 分批处理大数据
ipcMain.handle('process-large-data', async (event, data) => {
const BATCH_SIZE = 1000;
const results = [];
for (let i = 0; i < data.length; i += BATCH_SIZE) {
const batch = data.slice(i, i + BATCH_SIZE);
const batchResult = await processBatch(batch);
results.push(...batchResult);
// 发送进度更新
event.sender.send('process-progress', {
processed: i + batch.length,
total: data.length
});
}
return results;
});错误处理和安全检查:
1
2
3
4
5
6
7
8
9
10
11
12
13
14
15
16
17
18
19
20
21
22
23
24// typescript:frontend/src-electron/electron-main.ts
// 带验证的处理器
ipcMain.handle('secure-operation', async (event, ...args) => {
// 检查发送者
if (!isValidSender(event.sender)) {
throw new Error('未授权的请求');
}
try {
// 验证参数
validateArgs(args);
// 执行操作
const result = await performSecureOperation(...args);
// 记录操作
await logOperation(event.sender.id, 'secure-operation', args);
return result;
} catch (error) {
console.error('安全操作失败:', error);
throw error;
}
});组织和管理 IPC 处理器:
1
2
3
4
5
6
7
8
9
10
11
12
13
14
15
16
17
18// typescript:frontend/src-electron/ipc-handlers/index.ts
// 模块化 IPC 处理器
import { configHandlers } from './config-handlers';
import { fileHandlers } from './file-handlers';
import { windowHandlers } from './window-handlers';
export function setupIpcHandlers() {
// 配置相关
ipcMain.handle('get-config', configHandlers.getConfig);
ipcMain.handle('save-config', configHandlers.saveConfig);
// 文件相关
ipcMain.handle('read-file', fileHandlers.readFile);
ipcMain.handle('write-file', fileHandlers.writeFile);
// 窗口相关
ipcMain.on('window-control', windowHandlers.handleWindowControl);
}调试和日志:
1
2
3
4
5
6
7
8
9
10
11
12
13
14// typescript:frontend/src-electron/electron-main.ts
// 添加调试日志
function createIpcLogger(channel: string) {
return (event: Electron.IpcMainEvent, ...args: any[]) => {
console.log(`[IPC] ${channel}:`, {
windowId: event.sender.id,
args: args,
timestamp: new Date().toISOString()
});
};
}
// 使用日志装饰器
ipcMain.on('important-channel', createIpcLogger('important-channel'));
注意事项:
安全性:
- 始终验证输入数据
- 限制可访问的系统资源
- 注意跨域和权限问题
性能:
- 避免在主进程中进行密集计算
- 合理使用异步操作
- 考虑使用 Worker 进程
可维护性:
- 模块化处理器
- 统一错误处理
- 添加适当的日志
资源管理:
- 及时清理不用的监听器
- 正确处理窗口关闭事件
- 管理好内存使用
electron中, ipcRenderer 和 ipcMain 在使用过程中必须保持的对应关系
是的,ipcRenderer 和 ipcMain 在使用过程中需要保持一定的对应关系。以下是主要的对应模式:
基本对应关系:
1
2
3
4
5
6
7// 主进程 (electron-main.ts)
ipcMain.on('channel-name', (event, ...args) => {
// 处理来自渲染进程的消息
});
// 渲染进程 (通过preload.ts暴露给前端)
ipcRenderer.send('channel-name', ...args);同步通信对应:
1
2
3
4
5
6
7
8// 主进程
ipcMain.on('sync-channel', (event, ...args) => {
// 处理同步请求
event.returnValue = '结果'; // 必须设置returnValue
});
// 渲染进程(TIPS: 在渲染进程中直接调用是不可取的, 需要通过preload.ts结合contextBridge来暴露给前端渲染进程使用。 下一小节会介绍完整的使用流程)
const result = ipcRenderer.sendSync('sync-channel', ...args); // 比如可以在electron-preload.ts中的contextBridge.exposeInMainWorld回调暴露给前端(渲染进程)的方法中, 作为某个方法的返回值return给前端(渲染进程)。异步请求-响应模式(推荐):
1
2
3
4
5
6
7
8
9
10
11
12
13
14
15
16// typescript:frontend/src-electron/preload.ts
// 预加载脚本中暴露接口
contextBridge.exposeInMainWorld('electronAPI', {
// Promise方式调用
invokeMain: async (...args) => {
return await ipcRenderer.invoke('async-channel', ...args);
},
// 回调方式发送
sendToMain: (callback) => {
ipcRenderer.send('message-channel', 'some-data');
ipcRenderer.once('message-reply', (_event, result) => {
callback(result);
});
}
});1
2
3
4
5
6
7
8
9
10
11
12
13
14
15// typescript:frontend/src-electron/electron-main.ts
// 主进程
// 处理 invoke 调用
ipcMain.handle('async-channel', async (event, ...args) => {
const result = await someAsyncOperation(...args);
return result;
});
// 处理普通消息
ipcMain.on('message-channel', (event, ...args) => {
// 处理消息
event.reply('message-reply', '处理结果');
// 或
event.sender.send('message-reply', '处理结果');
});双向通信模式:
1
2
3
4
5
6
7
8
9
10
11
12
13
14// typescript:frontend/src-electron/preload.ts
contextBridge.exposeInMainWorld('electronAPI', {
// 监听主进程消息
onMainEvent: (callback) => {
const listener = (_event, ...args) => callback(...args);
ipcRenderer.on('main-event', listener);
return () => ipcRenderer.removeListener('main-event', listener);
},
// 发送消息到主进程
sendToMain: (data) => {
ipcRenderer.send('renderer-event', data);
}
});1
2
3
4
5
6
7
8
9
10
11
12
13// typescript:frontend/src-electron/electron-main.ts
// 主进程
// 监听渲染进程消息
ipcMain.on('renderer-event', (event, data) => {
// 处理消息
console.log('收到渲染进程消息:', data);
// 可以发送回复
event.reply('main-event', '已收到消息');
});
// 主动发送消息给渲染进程
mainWindow?.webContents.send('main-event', '来自主进程的消息');
注意事项:
通道名称(channel)必须完全匹配:
1
2
3
4
5
6
7// ❌ 错误示例:通道名不匹配
ipcMain.on('channel-1', () => {});
ipcRenderer.send('channel-2', data); // 消息永远不会被接收
// ✅ 正确示例:通道名匹配
ipcMain.on('channel-name', () => {});
ipcRenderer.send('channel-name', data);处理方式要对应:
1
2
3
4
5
6
7// ❌ 错误示例:处理方式不匹配
ipcMain.on('channel', () => {}); // on 用于处理 send
ipcRenderer.invoke('channel'); // invoke 需要用 handle 处理
// ✅ 正确示例:处理方式匹配
ipcMain.handle('channel', () => {}); // handle 用于处理 invoke
ipcRenderer.invoke('channel');返回值处理:
1
2
3
4
5
6
7
8
9// ❌ 错误示例:同步消息没有设置返回值
ipcMain.on('sync-msg', (event) => {
// 没有设置 returnValue,渲染进程会一直等待
});
// ✅ 正确示例:同步消息设置返回值
ipcMain.on('sync-msg', (event) => {
event.returnValue = '结果'; // 同步消息必须设置 returnValue
});清理监听器:
1
2
3
4
5
6
7
8
9
10
11// ✅ 推荐做法:返回清理函数
function setupIPC() {
const cleanup = window.electronAPI.onMainEvent((data) => {
console.log(data);
});
// 组件卸载时清理
onUnmounted(() => {
cleanup();
});
}
electron中, 如何完整前正确的使用ipcRenderer和ipcMain
不能直接在渲染进程中使用 ipcRenderer,这是因为 Electron 的安全限制。正确的做法是通过预加载脚本(preload)和 contextBridge 来暴露必要的 API。
以下是完整的设置流程:
首先在主进程中配置
webPreferences:1
2
3
4
5
6
7
8// typescript:frontend/src-electron/electron-main.ts
const mainWindow = new BrowserWindow({
webPreferences: {
contextIsolation: true, // 开启上下文隔离
nodeIntegration: false, // 关闭 Node 集成
preload: path.join(__dirname, 'preload.js') // 指定预加载脚本
}
});在预加载脚本中暴露 API:
1
2
3
4
5
6
7
8
9
10
11
12
13
14
15
16
17
18
19
20
21
22
23
24
25
26
27
28
29
30
31
32
33
34
35
36
37
38// typescript:frontend/src-electron/preload.ts
import { contextBridge, ipcRenderer } from 'electron';
// 通过 contextBridge 暴露安全的 API
contextBridge.exposeInMainWorld('electronAPI', {
// 发送消息
send: (channel: string, ...args: any[]) => {
// 可以添加通道白名单检查
const validChannels = ['save-data', 'load-data', 'update-config'];
if (validChannels.includes(channel)) {
ipcRenderer.send(channel, ...args);
}
},
// 调用主进程方法
invoke: async (channel: string, ...args: any[]) => {
const validChannels = ['get-user-data', 'process-file'];
if (validChannels.includes(channel)) {
return await ipcRenderer.invoke(channel, ...args);
}
throw new Error(`Invalid channel: ${channel}`);
},
// 监听主进程消息
on: (channel: string, callback: (...args: any[]) => void) => {
const validChannels = ['update-status', 'new-message'];
if (validChannels.includes(channel)) {
const subscription = (_event: any, ...args: any[]) => callback(...args);
ipcRenderer.on(channel, subscription);
// 返回清理函数
return () => {
ipcRenderer.removeListener(channel, subscription);
};
}
return () => {}; // 返回空清理函数
}
});添加类型定义:
1
2
3
4
5
6
7
8
9
10// typescript:frontend/src/types/electron.d.ts
declare global {
interface Window {
electronAPI: {
send: (channel: string, ...args: any[]) => void;
invoke: (channel: string, ...args: any[]) => Promise<any>;
on: (channel: string, callback: (...args: any[]) => void) => () => void;
}
}
}在渲染进程(前端代码)中使用:
1
2
3
4
5
6
7
8
9
10
11
12
13
14
15
16
17
18
19
20
21
22
23
24
25
26
27
28
29// typescript:frontend/src/components/YourComponent.vue
<script setup lang="ts">
import { onUnmounted } from 'vue';
// 发送消息
function handleSave() {
window.electronAPI.send('save-data', { key: 'value' });
}
// 异步调用
async function loadData() {
try {
const data = await window.electronAPI.invoke('get-user-data');
console.log('加载的数据:', data);
} catch (error) {
console.error('加载失败:', error);
}
}
// 监听主进程消息
const cleanup = window.electronAPI.on('update-status', (status) => {
console.log('状态更新:', status);
});
// 组件卸载时清理监听器
onUnmounted(() => {
cleanup();
});
</script>使用 Vuex/Pinia 状态管理:
1
2
3
4
5
6
7
8
9
10
11
12
13
14
15
16
17
18
19
20
21
22
23
24
25
26// typescript:frontend/src/stores/electron.ts
import { defineStore } from 'pinia';
export const useElectronStore = defineStore('electron', {
state: () => ({
status: '',
messages: [] as string[]
}),
actions: {
async initialize() {
// 设置监听器
window.electronAPI.on('update-status', (status) => {
this.status = status;
});
window.electronAPI.on('new-message', (message) => {
this.messages.push(message);
});
},
async sendMessage(message: string) {
await window.electronAPI.invoke('send-message', message);
}
}
});错误处理和类型安全:
1
2
3
4
5
6
7
8
9
10
11
12
13
14
15
16// typescript:frontend/src/utils/electron.ts
// 封装 electron API 调用
export async function invokeMain<T>(
channel: string,
...args: any[]
): Promise<T> {
try {
return await window.electronAPI.invoke(channel, ...args);
} catch (error) {
console.error(`调用 ${channel} 失败:`, error);
throw error;
}
}
// 使用
const userData = await invokeMain<UserData>('get-user-data');
注意事项:
安全性:
- 始终使用
contextIsolation: true - 在预加载脚本中验证通道名称
- 限制暴露的 API 范围
- 始终使用
类型安全:
- 定义完整的类型声明
- 使用泛型约束返回值类型
- 处理所有可能的错误情况
性能:
- 避免频繁的 IPC 通信
- 合理使用缓存
- 批量处理数据
可维护性:
- 集中管理 IPC 通道名称
- 使用状态管理统一处理数据
- 做好错误处理和日志记录
这样的设置可以确保:
- 安全性:通过上下文隔离保护主进程
- 类型安全:提供完整的类型支持
- 可维护性:集中管理 IPC 通信
- 性能:避免不必要的通信开销
electron启动过程中, 相关的生命周期的基本常识
渲染进程是随着 BrowserWindow 的创建和加载而启动的。
让我们看看具体的流程:
1 | // typescript:frontend/src-electron/electron-main.ts |
渲染进程的启动顺序:
- 主进程启动
- 等待 app ready
- 创建 BrowserWindow 实例
- 加载页面(loadURL/loadFile)
- 创建渲染进程
- 执行预加载脚本(preload)
- 加载并执行页面的 JavaScript
因此,如果你需要在渲染进程启动前做一些初始化工作,可以在 createWindow 调用前进行:
1 | // typescript:frontend/src-electron/electron-main.ts |
.png)